LuaDNS API를 이용한 무료도메인 와일드카드 SSL 인증서 발급 받기
컨텐츠 정보
- 37,526 조회
- 0 추천
- 목록
본문
1. 들어가며
무료 DNS 서비스로 클라우드플레어를 추천하지만, 클라우드플레어는 Freenom의 무료도메인(ga,tk,ml,cf,gq)에 대해 API 인증을 지원하지 않습니다.
따라서 와일드카드 SSL 발급이나 DDNS 기능 또한 제공하지 않습니다.
무료 도메인의 DNS API 서비스에 대한 대안으로 LuaDNS를 추천합니다.
2. LuaDNS 가입하기
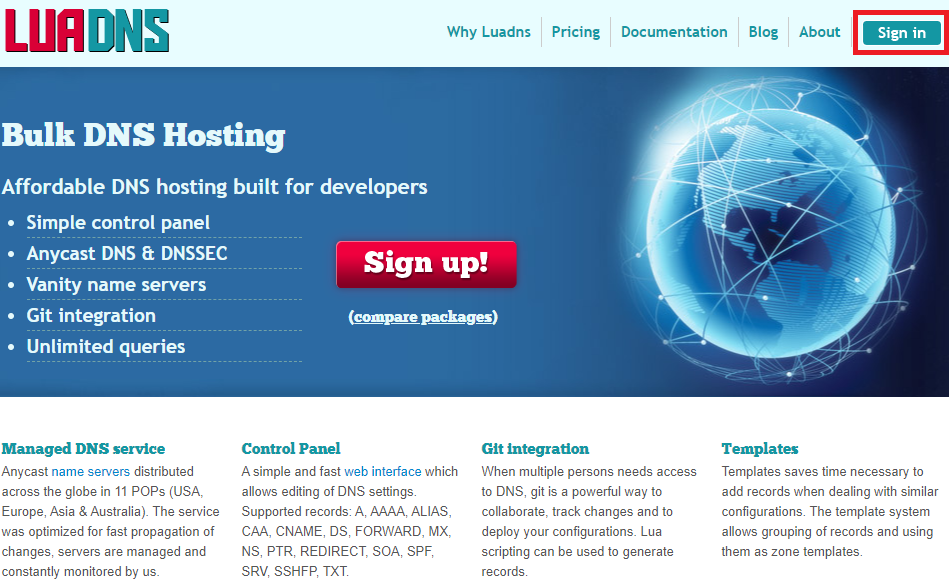
위 링크에서 가입합니다.
위 링크로 Zone에 들어갑니다.
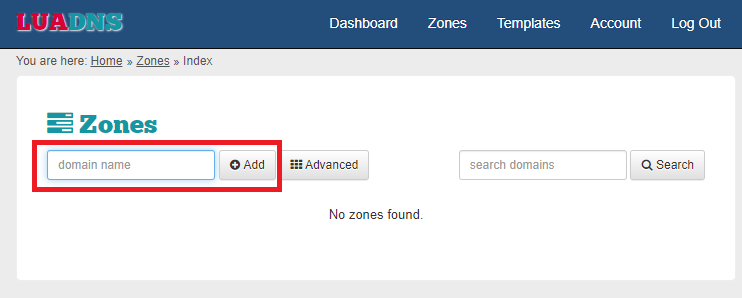
자신의 무료 도메인 이름을 넣고 Add를 누릅니다.
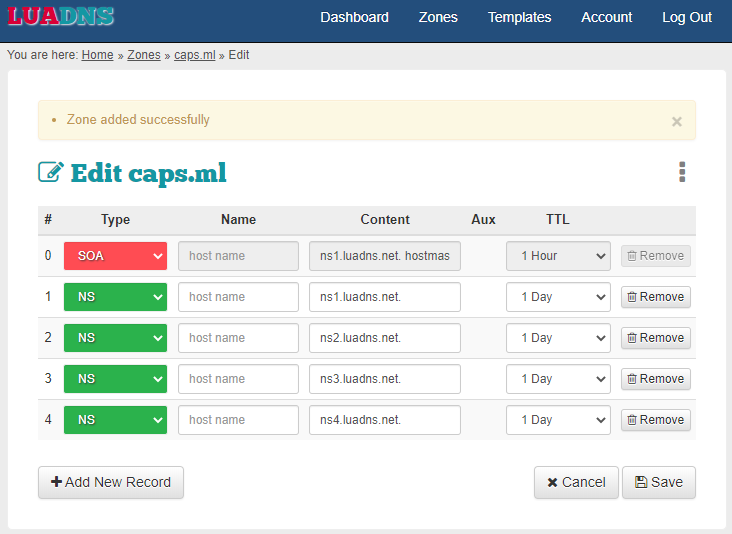
위와 같이 도메인이 추가되었습니다.
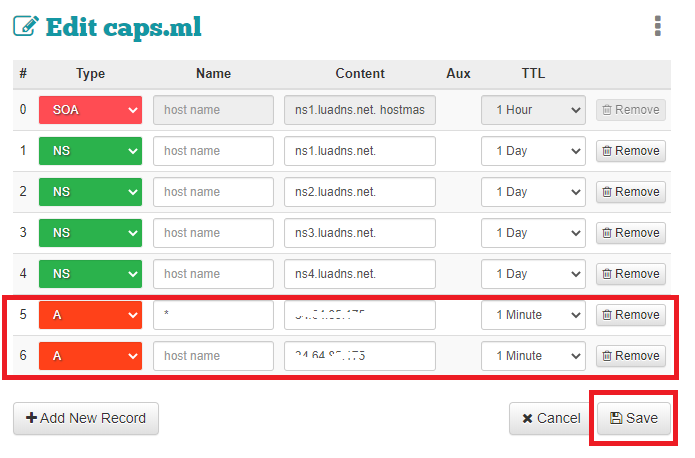
그리고 위와 같이 +Add New Record를 2번 누른 후
첫번째 칸 : Type에 A, Name에 *, Content에 자신의 서버 IP, TTL에는 1 Minute 를 넣습니다.
두번째 칸 : Type에 A, Name에 빈칸 그대로, Content에 자신의 서버 IP, TTL에는 1 Minute 를 넣습니다.
그리고 Save를 눌러줍니다.
이제 자신의 도메인이 해당 IP에 연결이 되며, 모든 서브 도메인(blog.caps.ml 등)도 해당 IP로 연결될 것입니다.
3. Freenom Nameserver 변경하기
이제 https://www.freenom.com 에 로그인하여
Service -> My Domains -> Manage Domain -> Management Tools -> Nameservers
선택 후 Use custom nameservers (enter below) 를 선택합니다.
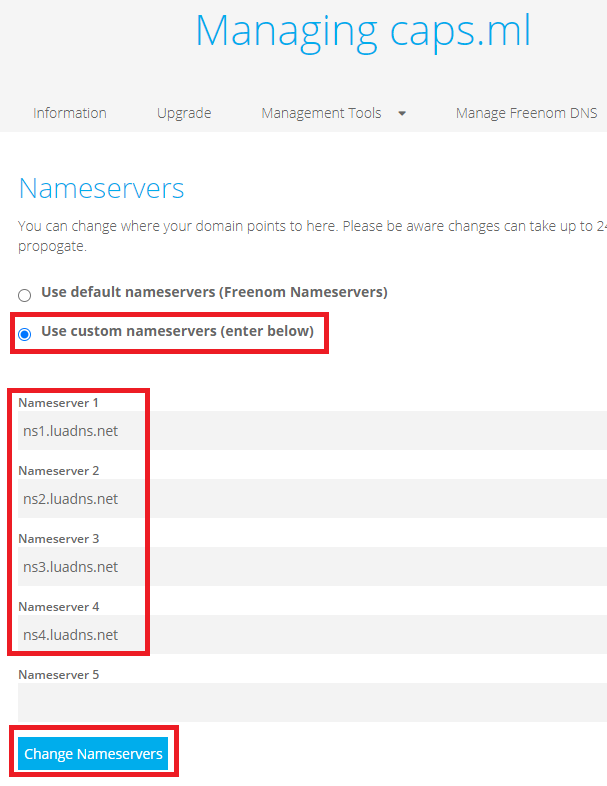
위와 같이 Nameserver 1~4까지
ns1.luadns.net
ns2.luadns.net
ns3.luadns.net
ns4.luadns.net
위 내용을 넣고 Change Nameserver를 클릭합니다.
4. LuaDNS API Token 값 찾기
https://api.luadns.com/settings
위 링크에 들어가서
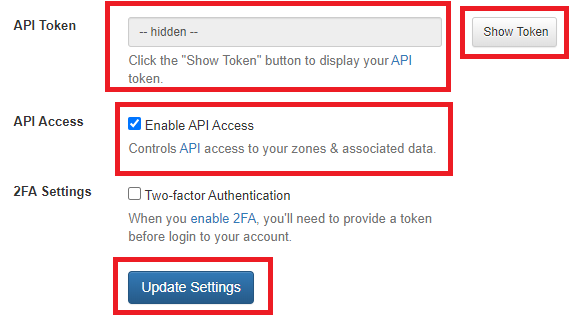
위와 같이 Show Token을 누르면 옆에 토큰 값이 나옵니다.
1234567890abcdedfadda1234551cdfdf 이런 형식으로 나올 것입니다.
그 값을 복사합니다.
그리고 밑에 Enable API Access 에 체크합니다.
그리고 Update Settings를 누릅니다.
5. Ubuntu 20.04 DNS 인증을 통한 와일드카드 인증서 발급받기
(1) acme.sh 설치하기
acme.sh는 certbot 패키지를 설치하지 않고, SSL 인증서 관리를 편하게 해주는 툴입니다.
DNS 인증을 통한 와일드카드 인증서 발급, ECDSA 와일드카드 인증서 발급, 자동 갱신이 기본적으로 탑재되어 있습니다.
sudo su
위 명령어로 root 계정으로 들어갑니다.
root 계정이 아니면 권한 문제가 생길 수 있습니다. 공식 매뉴얼에는 sudo 명령어를 추천하지 않습니다.
curl https://get.acme.sh | sh
위 명령어로 설치할 수 있습니다. 만약에 안된다면
wget -O - https://get.acme.sh | sh
위 명령어로도 설치할 수 있습니다.
# curl https://get.acme.sh | sh
  % Total    % Received % Xferd  Average Speed   Time    Time     Time  Current
                                 Dload  Upload   Total   Spent    Left  Speed
100   775    0   775    0     0   1777      0 --:--:-- --:--:-- --:--:--  1773
  % Total    % Received % Xferd  Average Speed   Time    Time     Time  Current
                                 Dload  Upload   Total   Spent    Left  Speed
100  193k  100  193k    0     0   556k      0 --:--:-- --:--:-- --:--:--  556k
[Sat Jul 25 04:09:46 UTC 2020] Installing from online archive.
[Sat Jul 25 04:09:46 UTC 2020] Downloading https://github.com/acmesh-official/acme.sh/archive/master.tar.gz
[Sat Jul 25 04:09:47 UTC 2020] Extracting master.tar.gz
[Sat Jul 25 04:09:47 UTC 2020] It is recommended to install socat first.
[Sat Jul 25 04:09:47 UTC 2020] We use socat for standalone server if you use standalone mode.
[Sat Jul 25 04:09:47 UTC 2020] If you don't use standalone mode, just ignore this warning.
[Sat Jul 25 04:09:47 UTC 2020] Installing to /root/.acme.sh
[Sat Jul 25 04:09:47 UTC 2020] Installed to /root/.acme.sh/acme.sh
[Sat Jul 25 04:09:47 UTC 2020] Installing alias to '/root/.bashrc'
[Sat Jul 25 04:09:47 UTC 2020] OK, Close and reopen your terminal to start using acme.sh
[Sat Jul 25 04:09:47 UTC 2020] Installing cron job
no crontab for root
no crontab for root
[Sat Jul 25 04:09:47 UTC 2020] Good, bash is found, so change the shebang to use bash as preferred.
[Sat Jul 25 04:09:47 UTC 2020] OK
[Sat Jul 25 04:09:47 UTC 2020] Install success!
위와 같이 설치가 됩니다. 빨간색 글자가 나오는데, 무시해도 됩니다.
SSH 터미널(Putty 등)을 끄고, 다시 접속합니다.
SSH에 다시 접속하면 별다른 작업을 하지 않아도 root 계정으로 acme.sh 명령어를 바로 쓸 수 있습니다.
터미널을 끄지 않으면 acme.sh 명령어가 작동하지 않습니다. 꼭 터미널을 끄고 다시 접속해주세요!
(2) SSH에서 API 값과 이메일 주소 입력하기
4. LuaDNS API Token 값 찾기에서 복사했던 그 값을 넣으면 됩니다.
export LUA_Key="1234567890abcdedfadda1234551cdfdf"
위와 같이 입력합니다.
export LUA_Email="abcd@emal.com"
위와 같은 형식으로 이메일 주소도 입력합니다.
(3) 와일드카드 SSL 인증서 발급받기
sudo su
mkdir -p /etc/nginx/ssl
위 명령어로 root로 로그인 후 인증서 발급 받을 폴더를 생성합니다.
인증서 발급 받을 폴더를 변경할 수 있습니다. 변경했다면 밑에 생성 명령어에서 해당 부분을 수정하면 됩니다.
이제 인증서를 발급 받을 차례입니다.
Nginx의 경우
acme.sh --issue --dns dns_lua -d example.com -d *.example.com --key-file /etc/nginx/ssl/privkey.pem --fullchain-file /etc/nginx/ssl/fullchain.pem --cert-file /etc/nginx/ssl/chain.pem --reloadcmd "systemctl reload nginx.service"
위와 같이 넣으면 됩니다. 위의 example.com 부분을 자신의 도메인 주소로 바꾸고 실행해봅니다.
Apache의 경우
acme.sh --issue --dns dns_lua -d example.com -d *.example.com --key-file /etc/nginx/ssl/privkey.pem --fullchain-file /etc/nginx/ssl/fullchain.pem --cert-file /etc/nginx/ssl/chain.pem --reloadcmd "service apache2 force-reload"
위와 같이 넣으면 됩니다. 위의 example.com 부분을 자신의 도메인 주소로 바꾸고 실행해봅니다.
실행 결과
[Sat Jul 25 04:21:10 UTC 2020] Create account key ok.systemctl reload nginx.serv
[Sat Jul 25 04:21:10 UTC 2020] Registering account
[Sat Jul 25 04:21:12 UTC 2020] Registered
[Sat Jul 25 04:21:12 UTC 2020] ACCOUNT_THUMBPRINT='xxxxxxxxxxxxxxxxxxxxxxxxxxxxxxxxx'
[Sat Jul 25 04:21:12 UTC 2020] Creating domain key
[Sat Jul 25 04:21:12 UTC 2020] The domain key is here: /root/.acme.sh/caps.ml/caps.ml.key
[Sat Jul 25 04:21:44 UTC 2020] Multi domain='DNS:caps.ml,DNS:*.caps.ml'
[Sat Jul 25 04:21:44 UTC 2020] Getting domain auth token for each domain
[Sat Jul 25 04:21:49 UTC 2020] Getting webroot for domain='caps.ml'
[Sat Jul 25 04:21:49 UTC 2020] Getting webroot for domain='*.caps.ml'
[Sat Jul 25 04:21:49 UTC 2020] Adding txt value: Q49bE5Z0flt-J81Zq-CSf1_Y_Y-RPpfNhI_aobG8wTU for domain:  _acme-challenge.caps.ml
[Sat Jul 25 04:21:51 UTC 2020] Adding record
[Sat Jul 25 04:21:52 UTC 2020] Added
[Sat Jul 25 04:21:52 UTC 2020] The txt record is added: Success.
[Sat Jul 25 04:21:52 UTC 2020] Adding txt value: 4XKqWyiZbENh81rqN4ouAa44eKK4b8mpyGMCc2WB8N0 for domain:  _acme-challenge.caps.ml
[Sat Jul 25 04:21:53 UTC 2020] Adding record
[Sat Jul 25 04:21:53 UTC 2020] Added
[Sat Jul 25 04:21:53 UTC 2020] The txt record is added: Success.
[Sat Jul 25 04:21:53 UTC 2020] Let's check each DNS record now. Sleep 20 seconds first.
[Sat Jul 25 04:22:15 UTC 2020] Checking caps.ml for _acme-challenge.caps.ml
[Sat Jul 25 04:22:15 UTC 2020] Domain caps.ml '_acme-challenge.caps.ml' success.
[Sat Jul 25 04:22:15 UTC 2020] Checking caps.ml for _acme-challenge.caps.ml
[Sat Jul 25 04:22:15 UTC 2020] Domain caps.ml '_acme-challenge.caps.ml' success.
[Sat Jul 25 04:22:15 UTC 2020] All success, let's return
[Sat Jul 25 04:22:15 UTC 2020] Verifying: caps.ml
[Sat Jul 25 04:22:19 UTC 2020] Success
[Sat Jul 25 04:22:19 UTC 2020] Verifying: *.caps.ml
[Sat Jul 25 04:22:22 UTC 2020] Success
[Sat Jul 25 04:22:22 UTC 2020] Removing DNS records.
[Sat Jul 25 04:22:22 UTC 2020] Removing txt: Q49bE5Z0flt-J81Zq-CSf1_Y_Y-RPpfNhI_aobG8wTU for domain: _acme-challenge.caps.ml
[Sat Jul 25 04:22:25 UTC 2020] Removed: Success
[Sat Jul 25 04:22:25 UTC 2020] Removing txt: 4XKqWyiZbENh81rqN4ouAa44eKK4b8mpyGMCc2WB8N0 for domain: _acme-challenge.caps.ml
[Sat Jul 25 04:22:28 UTC 2020] Removed: Success
[Sat Jul 25 04:22:28 UTC 2020] Verify finished, start to sign.
[Sat Jul 25 04:22:28 UTC 2020] Lets finalize the order, Le_OrderFinalize: https://acme-v02.api.letsencrypt.org/acme/finalize/92245922/4364287358
[Sat Jul 25 04:22:29 UTC 2020] Download cert, Le_LinkCert: https://acme-v02.api.letsencrypt.org/acme/cert/03a2480cb8571afc47095d1750e2370df922
[Sat Jul 25 04:22:30 UTC 2020] Cert success.
-----BEGIN CERTIFICATE-----
xxxxxxxxxxxxxxxxxxxxxxxxxxxxxxxxxxxxxxxxxxxxxxxxxxxxxxxxxx
-----END CERTIFICATE-----
[Sat Jul 25 04:22:30 UTC 2020] Your cert is in  /root/.acme.sh/caps.ml/caps.ml.cer
[Sat Jul 25 04:22:30 UTC 2020] Your cert key is in  /root/.acme.sh/caps.ml/caps.ml.key
[Sat Jul 25 04:22:30 UTC 2020] The intermediate CA cert is in  /root/.acme.sh/caps.ml/ca.cer
[Sat Jul 25 04:22:30 UTC 2020] And the full chain certs is there:  /root/.acme.sh/caps.ml/fullchain.cer
[Sat Jul 25 04:24:38 UTC 2020] Installing cert to:/etc/nginx/ssl/chain.pem
[Sat Jul 25 04:24:38 UTC 2020] Installing key to:/etc/nginx/ssl/privkey.pem
[Sat Jul 25 04:24:38 UTC 2020] Installing full chain to:/etc/nginx/ssl/fullchain.pem
[Sat Jul 25 04:24:38 UTC 2020] Run reload cmd: systemctl reload nginx.service
[Sat Jul 25 04:24:38 UTC 2020] Reload success
위와 같이 계정 인증, 도메인 인증, TXT 입력 후 알아서 삭제하고, 원하는 곳으로 인증서가 저장되는 것을 볼 수 있습니다.
위 방법은 기본적으로 RSA 기반 인증서입니다.
ECDSA 인증서를 발급 받고 싶으시면, 위 명령어에서 --keylength ec-256 (prime256v1, ECDSA P-256) 또는 --keylength ec-384 (secp384r1, ECDSA P-384)를 넣어주면 됩니다.
acme.sh --issue --dns dns_lua --keylength ec-256 -d example.com -d *.example.com --key-file /etc/nginx/ssl/privkey.ecdsa.pem --fullchain-file /etc/nginx/ssl/fullchain.ecdsa.pem --cert-file /etc/nginx/ssl/chain.ecdsa.pem --reloadcmd "systemctl reload nginx.service"
위 명령어로 Nginx에서 ECDSA P-256 와일드카드 인증서를 받을 수 있습니다.
acme.sh --issue --dns dns_lua --keylength ec-384 -d example.com -d *.example.com --key-file /etc/nginx/ssl/privkey.ecdsa.pem --fullchain-file /etc/nginx/ssl/fullchain.ecdsa.pem --cert-file /etc/nginx/ssl/chain.ecdsa.pem --reloadcmd "service apache2 force-reload"
위 명령어로 Apache에서 ECDSA P-384 와일드카드 인증서를 받을 수 있습니다.
보안과 속도를 적절히 타협해서 ECDSA P-256 인증서가 무난한 것 같습니다.
실행 결과
# acme.sh --issue --dns dns_lua --keylength ec-256 -d caps.ml -d *.caps.ml --key-file /etc/nginx/ssl/privkey.ecdsa.pem --fullchain-file /etc/nginx/ssl/fullchain.ecdsa.pem --cert-file /etc/nginx/ssl/chain.ecdsa.pem --reloadcmd "systemctl reload nginx.service"
[Sat Jul 25 04:53:05 UTC 2020] Creating domain key
[Sat Jul 25 04:53:05 UTC 2020] The domain key is here: /root/.acme.sh/caps.ml_ecc/caps.ml.key
[Sat Jul 25 04:53:05 UTC 2020] Multi domain='DNS:caps.ml,DNS:*.caps.ml'
[Sat Jul 25 04:53:05 UTC 2020] Getting domain auth token for each domain
[Sat Jul 25 04:53:08 UTC 2020] Getting webroot for domain='caps.ml'
[Sat Jul 25 04:53:08 UTC 2020] Getting webroot for domain='*.caps.ml'
[Sat Jul 25 04:53:08 UTC 2020] caps.ml is already verified, skip dns-01.
[Sat Jul 25 04:53:08 UTC 2020] *.caps.ml is already verified, skip dns-01.
[Sat Jul 25 04:53:08 UTC 2020] Verify finished, start to sign.
[Sat Jul 25 04:53:08 UTC 2020] Lets finalize the order, Le_OrderFinalize: https://acme-v02.api.letsencrypt.org/acme/finalize/92245922/4364641465
[Sat Jul 25 04:53:10 UTC 2020] Download cert, Le_LinkCert: https://acme-v02.api.letsencrypt.org/acme/cert/04336fd1d35d0f32f239eee77ce5cf7432f2
[Sat Jul 25 04:53:10 UTC 2020] Cert success.
-----BEGIN CERTIFICATE-----
xxxxxxxxxxxxxxxxxxxxxxxxxxxxxxxxxxxxxxxxx
-----END CERTIFICATE-----
[Sat Jul 25 04:53:10 UTC 2020] Your cert is in  /root/.acme.sh/caps.ml_ecc/caps.ml.cer
[Sat Jul 25 04:53:10 UTC 2020] Your cert key is in  /root/.acme.sh/caps.ml_ecc/caps.ml.key
[Sat Jul 25 04:53:10 UTC 2020] The intermediate CA cert is in  /root/.acme.sh/caps.ml_ecc/ca.cer
[Sat Jul 25 04:53:10 UTC 2020] And the full chain certs is there:  /root/.acme.sh/caps.ml_ecc/fullchain.cer
[Sat Jul 25 04:53:10 UTC 2020] Installing cert to:/etc/nginx/ssl/chain.ecdsa.pem
[Sat Jul 25 04:53:10 UTC 2020] Installing key to:/etc/nginx/ssl/privkey.ecdsa.pem
[Sat Jul 25 04:53:10 UTC 2020] Installing full chain to:/etc/nginx/ssl/fullchain.ecdsa.pem
[Sat Jul 25 04:53:10 UTC 2020] Run reload cmd: systemctl reload nginx.service
[Sat Jul 25 04:53:11 UTC 2020] Reload success
위와 같이 이미 도메인 인증, DNS API 인증까지 받았기 때문에 순식간에 인증서가 나옵니다.
혹시 SSL 인증서 폴더를 잘못 지정하였거나, 새로 설치하고 싶다면
acme.sh --install-cert -d caps.ml -d *.caps.ml --key-file /etc/nginx/ssl/privkey.pem --fullchain-file /etc/nginx/ssl/fullchain.pem --cert-file /etc/nginx/ssl/chain.pem --reloadcmd "systemctl reload nginx.service"
위와 같이 --install-cert 명령어를 넣어주면 다시 원하는 곳을 인증서를 설치해줍니다.
acme.sh에 대한 추가적인 내용은
https://www.wsgvet.com/bbs/board.php?bo_table=home&wr_id=639
위 링크의 5번부터 보시면 됩니다. (발급리스트 확인, 삭제 등등)
6. 참조링크
https://github.com/acmesh-official/acme.sh/wiki/dnsapi#8-use-luadns-domain-api
-
등록일 2020.10.10그누보드 SMTP 외부메일 설정하는 방법댓글 26
-
등록일 2020.10.03그누보드5에 실시간 채팅 구축하기댓글 13
-
등록일 2020.09.26
-
등록일 2020.09.24도커로 메일서버 구축하기댓글 4
관련자료
-
서명우성짱의 NAS를 운영하고 있습니다.
저의 즐거움이 여러분의 즐거움이면 좋겠습니다.


